AWS Secrets Manager in Kubernetes - Secret Rotation and Reloader

A focused boutique consulting partner to boot your current and future digital DevSecOps and Cloud Platform needs.
At BootLabs we are obsessed about building future-ready Intelligent Enterprise. We solve cloud automation problems with cutting-edge technologies while making sure the TCO is minimal. We enable organisational transformation to support the rapid application development and consistent releases.
HANDLING SECRETS AND PARAMETERS ON AWS EKS
Security best practices need the protection of personal data (e.g. passwords, tokens, API Keys). These details are often saved in AWS Secrets Manager or AWS Systems Manager Parameter Store when utilising AWS (SSM Parameter Store).
Secrets are straightforward to create and use in Amazon, but getting them from a Kubernetes cluster is not. We often need to obtain secrets from a pod to extract database credentials, API Keys, and so on.
In this article, we'll look at how to configure EKS to use secrets and parameters from Amazon Secrets Manager and AWS Systems Manager Parameter Store.
KUBERNETES SECRETS VERSUS AWS SECRETS
In Kubernetes to store secrets we can use the kind Secret:
apiVersion: v1
kind: Secret
metadata:
  name: test-secret
type: Opaque
data:
  password: JdkDSIGhhdZ
However, using the kind SecretProviderClass offered multiple advantages in a Cloud context:
Having a single file to configure the secrets allows one to manage them from a single place.
Having secrets outside of the cluster eases the possible integration with external tools. It is also very easy to share a secret across several Kubernetes namespaces and to keep it in sync.
This externalisation allows also delegating the creation of the secret to an Infrastructure as Code (IaC) tool for example. This way there is no need to find a solution to access Kubernetes’ API (often in private subnets) to create secrets and keep them up to date.Using AWS Secrets Manager or AWS SSM Parameter Store from an EKS cluster in correlation with Kubernetes service accounts allows fined grain control over who can access which secrets. It is also easily possible to define groups of secrets with a reusable list of secrets.
PREREQUISITES
To utilise Amazon Secrets Manager or AWS SSM Parameter Store from Kubernetes, additional configuration is necessary.
We must do the following:
An IAM policy, with permissions to retrieve secrets from Secret Manager.
Create Secrets in Secretsmanager below are the supported Secret Types
A Secrets Manager simple secret (a plain text secret)
A Secrets Manager JSON formatted secret (the secret is the whole JSON).
An SSM Parameter Store parameter.
To connect IAM roles with Kubernetes ServiceAccounts, create an OpenID Connect identity provider
Install the Kubernetes Secrets Store CSI Driver
Install the AWS Secrets and Configuration Provider (ASCP)
Install the Reloader
IAM role and policy
Then we need to create an IAM policy and an IAM role to be used by a service account. Use IAM roles for service accounts (IRSA) to limit secret access to your pods. By setting this up, the provider will retrieve the pod identity and exchange this identity for an IAM role. AWS Secrets and Config provider (ASCP) will then assume the IAM role of the pod and only retrieve secrets from Secrets Manager that the pod is authorized to access. This prevents the container from accessing secrets that are intended for another container that belongs to another pod.
A service account provides an identity for processes that run in a Pod. These processes will have the permissions of the AWS IAM role attached to the service account.
The following policy allows:
The retrieval of secrets from AWS Secrets Manager and AWS SSM Parameter Store
Allowing only the secrets that needed to be loaded ( For minimal access )
The use of a KMS key (required if the secrets are encrypted).
IAM Policy Document
{
    "Version": "2012-10-17",
    "Statement": [
        {
            "Action": [
                "secretsmanager:DescribeSecret",
                "secretsmanager:GetSecretValue"
            ],
            "Effect": "Allow",
            "Resource": [
                "arn:aws:secretsmanager:<AWS_REGION>:<AWS_ACCOUNT_ID>:secret:mySimpleSecret-s8Yb7Y",        #Added Secret1 ARN
                "arn:aws:secretsmanager:<AWS_REGION>:<AWS_ACCOUNT_ID>:secret:myJSONSecret-Uaauu1",        #Added Secret2 ARN
                "arn:aws:secretsmanager:<AWS_REGION>:<AWS_ACCOUNT_ID>:secret:/dev/msk/password-iUq8oR"         #Added Secret3 ARN
                        ]

        }
}
To follow the principle of least privilege we create an IAM role with a trusted policy which restricts its usage to a specific EKS cluster, namespace and service account.
IAM Role - Restrict with Specific Namespace and Service account
{
  "Version": "2012-10-17",
  "Statement": [
    {
      "Effect": "Allow",
      "Action": "sts:AssumeRoleWithWebIdentity",
      "Principal": {
        "Federated": "arn:aws:iam::<AWS_ACCOUNT_ID>:oidc-provider/oidc.eks.<AWS_REGION>.amazonaws.com/id/<OIDC_ID>"
      },
      "Condition": {
        "StringEquals": {
          "oidc.eks.<AWS_REGION>.amazonaws.com/id/<OIDC_ID>:aud": "sts.amazonaws.com",
          "oidc.eks.<AWS_REGION>.amazonaws.com/id/<OIDC_ID>:sub": "system:serviceaccount:<K8S_NAMESPACE>:<SERVICE_ACCOUNT_NAME>"
        }
      }
    }
  ]
}
If Incase to allow all the Namespace and seviceaccounts in EKS cluster then follow the below IAM role with a trusted policy which restricts its usage to a specific EKS cluster.
IAM Role - Allows all Namespace and Service accounts
{
  "Version": "2012-10-17",
  "Statement": [
    {
      "Effect": "Allow",
      "Action": "sts:AssumeRoleWithWebIdentity",
      "Principal": {
        "Federated": "arn:aws:iam::<AWS_ACCOUNT_ID>:oidc-provider/oidc.eks.<AWS_REGION>.amazonaws.com/id/<OIDC_ID>"
      },
      "Condition": {
        "StringLike": {
          "oidc.eks.<AWS_REGION>.amazonaws.com/id/<OIDC_ID>:aud": "sts.amazonaws.com",
          "oidc.eks.<AWS_REGION>.amazonaws.com/id/<OIDC_ID>:sub": "system:serviceaccount:*"  #Allow all namespaces and serviceaccounts
        }
      }
    }
  ]
}
In this article, we will use test-app-secrets as the namespace and app-admin-account as the service account.
Let's look at how this can be implemented with terraform code
Terraform Code for Implementing all the above IAM Related
data "aws_eks_cluster" "eks_cluster" {
    name = "${var.env}-${var.clustername}"
}
data "aws_iam_openid_connect_provider" "eks_oidc_provider" {
  url = data.aws_eks_cluster.eks_cluster.identity[0].oidc[0].issuer
}

data "aws_secretsmanager_secrets" "retrieve_secrets" {
  filter {
    name   = "tag-value"
    values = [var.sub_system]
  }
}

data "aws_iam_policy_document" "app_secret_eks_policy" {
  statement {
    actions = [
      "secretsmanager:GetSecretValue",
      "secretsmanager:DescribeSecret"
    ]
    resources = flatten([data.aws_secretsmanager_secrets.retrieve_secrets.arns])
    effect    = "Allow"
  }
  depends_on = [
    module.secret_manager_secret
  ]
}

resource "aws_iam_policy" "app_secret_eks_policy" {
  name        = "${var.env}_${var.clustername}_api_readaccess_eks_Policy"
  description = "Custom policy for secret read access"
  policy      = data.aws_iam_policy_document.app_secret_eks_policy.json
}

resource "aws_iam_role" "app_secret_eks_role" {
  name               = "${var.env}-${var.clustername}-api-token-access"
  path               = "/"
  assume_role_policy = <<POLICY
{
    "Version": "2012-10-17",
    "Statement": [{
        "Effect": "Allow",
        "Principal": {
            "Federated": "${data.aws_iam_openid_connect_provider.eks_oidc_provider.arn}"
        },
        "Action": "sts:AssumeRoleWithWebIdentity",
        "Condition": {
            "StringLike": {
                "${replace(data.aws_eks_cluster.eks_cluster.identity[0].oidc[0].issuer, "https://", "")}:sub": "system:serviceaccount:*",
                "${replace(data.aws_eks_cluster.eks_cluster.identity[0].oidc[0].issuer, "https://", "")}:aud": "sts.amazonaws.com"
            }
        }
    }]
}
POLICY
}

resource "aws_iam_policy_attachment" "app_secret_eks_policy_role_attachment" {
  name       = "${var.env}-${var.clustername}-app-secret-policy-attach"
  policy_arn = aws_iam_policy.app_secret_eks_policy.arn
  roles      = [aws_iam_role.app_secret_eks_role.name]
}
The last step is to attach the policy with the role.
ServiceAccount kind
Now we can create a ServiceAccount to allow the pods to assume the IAM role.
Serviceaccount.yaml
apiVersion: v1
kind: ServiceAccount
metadata:
  name: app-admin-account
  namespace: test-app-secrets
  annotations:
    eks.amazonaws.com/role-arn: <IAM_SERVICE_ACCOUNT_ROLE_ARN>
It is important to note that this service account is only available to the specified namespace.
SecretProviderClass kind
To use the Secrets Store CSI driver, you have to create a SecretProviderClass custom resource. This provides driver configurations and provider-specific parameters to the CSI driver itself. With the SecretProviderClass kind we can define to which secrets a pod has access.
But first, we need to create some secrets and parameters:
A Secrets Manager simple secret (a plain text secret). This secret will be identified by mySimpleSecret in the examples below.
A Secrets Manager JSON formatted secret (the secret is the whole JSON). This secret will be identified by myJSONSecret in the examples below.
An SSM Parameter Store parameter. This parameter will be identified by /dev/msk/password in the examples below.
Then we can create a SecretProviderClass manifest.
SecretProviderClass.yaml
apiVersion: secrets-store.csi.x-k8s.io/v1
kind: SecretProviderClass
metadata:
  name: aws-secrets-providerclass
  namespace: test-app-secrets
spec:
  provider: aws
  parameters:
    objects: |
        - objectName: "mySimpleSecret"
          objectType: "secretsmanager"
        - objectName: "myJSONSecret"
          objectType: "secretsmanager"
        - objectName: "/dev/msk/password"
          objectType: "secretsmanager"
In this example, we have two secrets from AWS Secrets Manager (using the secret name) and one from SSM Parameter Store (using the parameter key).
Again, these secrets are only available inside the specified namespace.
DEPLOYING THE SOLUTION
Architecture
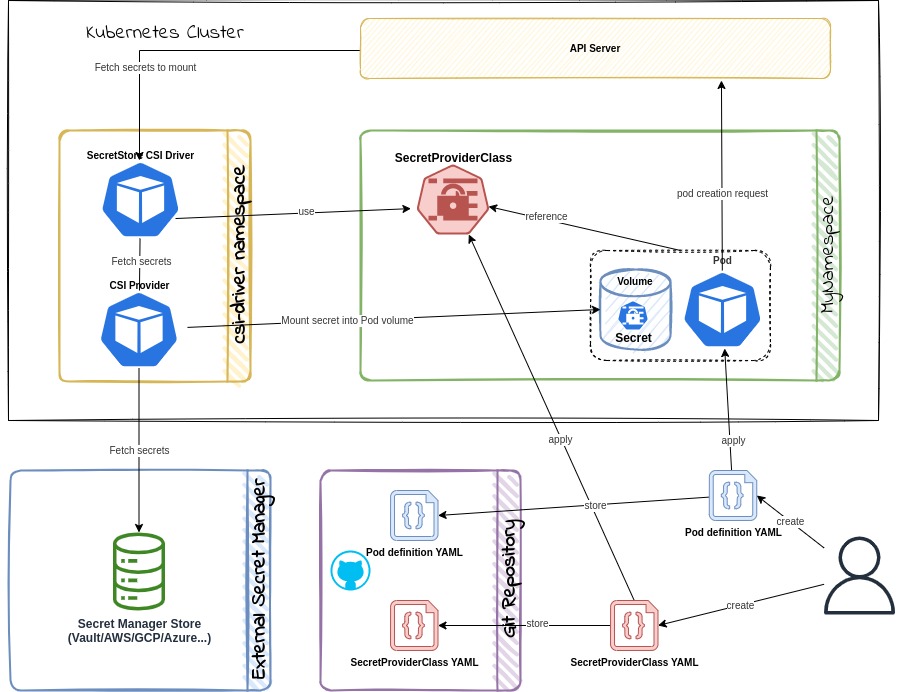
Retrieving Secrets and Parameters
Update your deployment YAML to use the secrets-store.csi.k8s.io driver, and reference the SecretProviderClass resource created previously. The following is an example of how to configure a pod to mount a volume based on the SecretProviderClass to retrieve secrets from Secrets Manager.
Finally, we are going to check that a Kubernetes pod can use the secrets and parameters we have previously defined. To do so we create a simple Kubernetes Deployment.
Deployment.yaml
apiVersion: apps/v1
kind: Deployment
metadata:
  name: test-hello-world
  namespace: test-app-secrets
  labels:
    app: nginx
spec:
  replicas: 1
  selector:
    matchLabels:
      app: nginx
  template:
    metadata:
      labels:
        app: nginx
    spec:
      serviceAccountName: app-admin-account
      volumes:
      - name: mount-secrets-access
        csi:
          driver: secrets-store.csi.k8s.io
          readOnly: true
          volumeAttributes:
            secretProviderClass: "aws-secrets-providerclass"
      containers:
      - name: demo-deployment
        image: nginx
        ports:
        - containerPort: 80
        volumeMounts:
        - name: mount-secrets-access
          mountPath: "/mnt/aws-secrets"
          readOnly: true
We mount a volume in the pod using the secrets-store.csi.k8s.io driver and the SecretProviderClass we created earlier.
Important notes:
namespace must be the same for the
SecretProviderClass,ServiceAccountandDeployment.serviceAccountName must have the same name as the
ServiceAccountcreated previously.secretProviderClass must have the same name as the
SecretProviderClasscreated previously.mountPath is the directory path in the pod file system where we will be able to read all the secrets and parameters included in the specified secret class.
volumes.name and volumeMounts.name can have any value but must be the same.
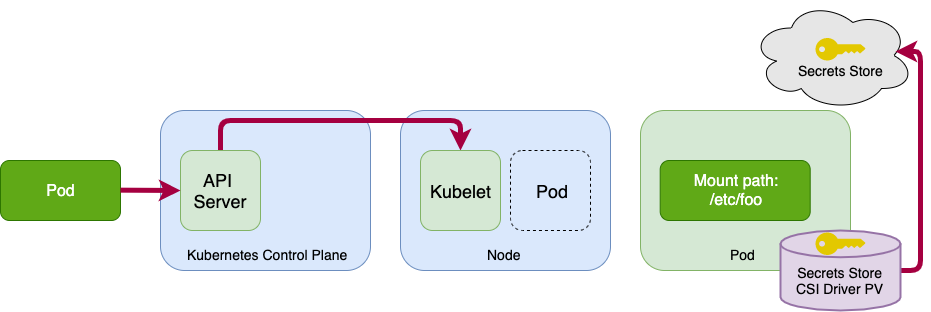
On pod start and restart, the CSI driver will call the provider binary to retrieve the secret and configurations from Secrets Manager and Parameter Store, respectively. After successfully retrieving this information, the CSI driver will mount them to the container’s file system.After the deployment we can connect to the pod and execute the following commands to check that our secrets are now accessible from our Kubernetes pod:
Validate Secret Mounts
$ ls /mnt/aws-secrets/
-rw-r--r-- 1 root root 11 Jan 31 23:10 mySQLsecret
-rw-r--r-- 1 root root 74 Jan 31 23:10 mySimpleSecret
-rw-r--r-- 1 root root 72 Jan 31 23:10 myJSONSecret

$ cat /mnt/aws-secrets/mySQLsecret
My parameter

$ cat /mnt/aws-secrets/mySimpleSecret
this !s N0t P@ssw0rd

$ cat /mnt/aws-secrets/myJSONSecret
{ "username": "usernameSecretValue","password": "passwordSecretValue" }
For the JSON secret, to only display a property we need an extra tool like jq:
$ cat /mnt/aws-secrets/myJSONSecret | jq -r .username
usernameSecretValue

$ cat /mnt/aws-secrets/myJSONSecret | jq -r .password
passwordSecretValue
We will see later a better way to retrieve these values.
Secrets and environment variables
Of course, retrieving secrets from a file comes with its limitation and we usually expect to have them in environment variables.
To do so we need to update the SecretProviderClass manifest:
apiVersion: secrets-store.csi.x-k8s.io/v1
kind: SecretProviderClass
metadata:
  name: aws-secrets-providerclass
  namespace: test-app-secrets
spec:
  provider: aws

### Start update
  secretObjects:
    - secretName: eks-local-secrets
      type: Opaque
      data:
        - objectName: mySimpleSecret
          key: simpleSecret
        - objectName: myJSONSecret
          key: jsonSecret
        - objectName: parameterAlias
          key: myParameter
### End update

  parameters:
    objects: |
###############
        - objectName: "mySimpleSecret"
          objectType: "secretsmanager"
        - objectName: "myJSONSecret"
          objectType: "secretsmanager"
### Start update
        - objectName: "/dev/msk/password"
          objectType: "secretsmanager"
          objectAlias: parameterAlias
### End update
We have added a new secretObjects section to create a Kubernetes secret named eks-local-secrets containing the three keys: simpleSecret, jsonSecret and parameterAlias.
Notes:
For AWS Secret Manager secrets, objectNames must have the same values in the secretObjects and parameters sections
For SSM Parameter Store secrets, we need to use an ObjectAlias where
parameters.objects.objectName = "/dev/msk/password"butsecretObjects.data.objectName = parameters.objects.objectAlias.
Next, we need to update the Deployment manifest.
[...]
      - name: secrets-store-inline
        csi:
          driver: secrets-store.csi.k8s.io
          readOnly: true
          volumeAttributes:
            secretProviderClass: "aws-secrets-providerclass"
      containers:
      - name: demo-deployment
        image: nginx
###Option1: Method for mapping each env variable with each secretkey reference
### Start update
        env:
          - name: SIMPLE_SECRET_ENV_VAR
            valueFrom:
              secretKeyRef:
                name: eks-local-secrets
                key: simpleSecret
          - name: JSON_SECRET_ENV_VAR
            valueFrom:
              secretKeyRef:
                name: eks-local-secrets
                key: jsonSecret
          - name: MY_PARAMETER
            valueFrom:
              secretKeyRef:
                name: eks-local-secrets
                key: myParameter
### End update
[...]
#Option2: Method for referencing the list of all secrets using envFrom
### Start update
        envFrom:
          - secretRef:
              name: eks-local-secrets
### End update
[...]
Set the envFrom key in each container to an object containing the list of secrets that need to be included. In this method, we do not need to map each env referencing the secret key. We can use either of these methods based on the use case.
We have added a new env section to have three environment variables: SIMPLE_SECRET_ENV_VAR, JSON_SECRET_ENV_VAR and JSON_SECRET_ENV_VAR where key references secretObjects.data.key from the SecretProviderClass configuration.
After re-deploying both manifests we can connect to the pod and execute the following commands to check that our secrets are now accessible from a Kubernetes pod:
Validate Secret Mounts
$ echo $SIMPLE_SECRET_ENV_VAR
this !s N0t P@ssw0rd

$ echo $JSON_SECRET_ENV_VAR
{"username": "usernameSecretValue","password": "passwordSecretValue"}

$ echo $MY_PARAMETER
My parameter
HANDLING JSON SECRETS
Storing JSON in an environment variable is rarely a good idea. But when we have no choice, we need to make sure that the value in AWS Secrets Manager is not stored in pretty printed format (with newlines, carriage returns, tabs, etc.) like in this example:
To solve this issue all formatting characters must be removed, otherwise we may end up with the environment variable JSON_SECRET_ENV_VAR containing only part of the JSON.
But we usually want to have the username and the password values from the JSON secret into two different environment variables. Fortunately, the jmesPath field allows us to do exactly that (JMESPath stands for JSON Matching Expression paths and is a query language for JSON).
Once again we need to update the SecretProviderClass manifest:
SecretProviderClass.yaml
apiVersion: secrets-store.csi.x-k8s.io/v1
kind: SecretProviderClass
metadata:
  name: aws-secrets-providerclass
  namespace: test-app-secrets
spec:
  provider: aws

  secretObjects:
    - secretName: eks-local-secrets
      type: Opaque
      data:
### Start update
        - objectName: usernameAlias
          key: username
        - objectName: passwordAlias
          key: password
### End Update

  parameters:
    objects: |
      - objectName: "myJSONSecret"
        objectType: "secretsmanager"
### Start update
        jmesPath:
          - path: username
            objectAlias: usernameAlias
          - path: password
            objectAlias: passwordAlias
### End Update
In the secretObjects section we added two dedicated variables (username and password) where keys are used as references in the Deployment manifest and object names are used as references in the parameters section. And like for AWS SSM Parameter Store secrets secret objects.data.objectName = parameters.objects.objectAlias.
We update the Deployment manifest one last time to have two environment variables (USERNAME and PASSWORD) as we previously did.
Deployment. yaml
apiVersion: apps/v1
kind: Deployment
[...]
        env:
        - name: USERNAME
          valueFrom:
            secretKeyRef:
              name: eks-local-secrets
              key: username
        - name: PASSWORD
          valueFrom:
            secretKeyRef:
              name: eks-local-secrets
              key: password
[...]
If we connect to the pod:
$ echo $USERNAME
usernameSecretValue

$ echo $PASSWORD
passwordSecretValue
Note: Now in the pod file system we have two new files named username and password containing the individual secret values.
SECRET ROTATION AND VERSIONING
The ability to rotate secrets is one of the most important security requirements, especially when data has been exposed. it is worth mentioning that the real added value of using the AWS Secrets and Configuration Provider is the ability to keep Kubernetes secrets synchronised with the AWS secrets. Without this feature, if an AWS secret is changed, the pod must be recreated to get the new secret value.
To enable this feature, we need to add two properties to the Secrets Store CSI Driver installation:
- Rotation can be enabled in the CSI driver by setting the -enable-secret-rotation flag in the secret store container. In addition, This can also be added to the helm chart using the below methods.
Feature Helm Parameter Sync as Kubernetes secret syncSecret.enabled=trueSecret Auto rotation enableSecretRotation=true
The polling interval can be set to control how often the mounted contents for all pods and Kubernetes secrets need to be updated to the newest version. The
rotation-poll-intervalis set to 2 minutes by default, however, it can be changed by setting up the propertyrotationPollIntervalSecretProviderClassPodStatusis a custom resource created by the driver to track the binding between a pod andSecretProviderClass. ThisSecretProviderClassPodStatusstatus also shows the secrets and versions that are currently loaded in the pod mount.
View the secret versions that are currently loaded in the pod mount.
kubectl get secretproviderclasspodstatus <pod_name>
Note: It is very important to keep in mind that this synchronization doesn’t update the environment variables. It only refreshes the secrets contained in the mounted secret volume. In our examples, it corresponds to the files in /mnt/secrets-store/. To update the environment variables linked to the secrets we still must restart the pod or use an extra tool like Reloader.
SECRETS RELOADER
Reloader watches for ConfigMap and Secret and detects if there are changes in the data of these objects. After change detection reloader performs a rolling upgrade on relevant Pods via associated Deployment, Daemonset and Statefulset.
Annotation for Secret
For a Deployment called foo have a Secret called foo. Then add this annotation* to your Deployment
Deployment.yaml
apiVersion: apps/v1
kind: Deployment
metadata:
   name: test-hello-world
   namespace: test-app-secrets
   labels:
      app: nginx
   annotations:
     reloader.stakater.com/auto: "true"
     secret.reloader.stakater.com/reload: eks-local-secrets       #Add the secret name that used in eks and to monitor by reloader
*The default annotation can be changed with the --secret-annotation flag
Above mentioned annotation also works for Daemonsets Statefulsets and Rollouts
Verify Reloader's Working
Reloader's working can be verified by three ways.
Verify from logs
Check the logs of the reloader and verify that you can see the logs looks like below, if you can find these logs then it means the reloader is working.
Changes Detected in test-object of type 'SECRET' in namespace: test-reloader

Updated test-resource of type Deployment in namespace: test-reloader
Below are the details that explain these logs:
Verify by checking the age of the Pod
A pod's age can tell whether the reloader is working correctly or not. If you know that a change in a secret or configmap has occurred, then check the relevant Pod's age immediately. It should be newly created a few moments ago.
Verify from Kubernetes Dashboard
kubernetes dashboard can be used to verify the working of Reloader. After a change in secret or configmap, check the relevant Pod's age from the dashboard. It should be newly created a few moments ago.
Verify from the command line
After a change in secret or configmap. Run the below-mentioned command and verify that the pod is newly created.
kubectl get pods <pod name> -n <namespace name>
Author : Chokkalingam